Friday, April 12, 2024

Suzz's Neutral Flowers

Hi! Suzz here!  I am loving the challenge this time to  highlight flowers!   Spring is here and the flowers are just starting to bloom by me.   I decided to combine the flowers with another challenge of using my new watercolor pencils from Tim in Scorched Timber, Jet Black and Picket Fence.  My goal was to use the neutral colors on the flowers and only use other colors around the flowers.


I love the Stampers Anonymous Tim Holtz Floral Trims flowers.  They let you color using various mediums with the beautifully drawn outlined flowers. 

For my first card I cut out a circular image that I stamped using a gray distress oxide ink. I was hoping to highlight the image using watercolor pencils and shading and having the stamped image blend in for a colorless outline.

Next  I used the scorched timber to add a touch of color around the petals of the flower and the green watercolor pencil in the leaves.  I then used a water brush to soften the edges of coloring. I came back with a yellow watercolor pencil to add a touch of yellow to the center of the flowers.  I used the water brush to blend that and soften the edges.

When I was done coloring, I decided to come back with the black watercolor pencil and add the lines again to the image to really make it pop.  I also shaded around the outside edges of the images with a hint of gray and blended with the water brush. 

To make the colors more intense, I sponged the entire surface with Versamark ink and then covered it with clear embossing powder. I heat set the embossing powder. Sometimes this process will  take two coats to get a glossy finish. 

The image was then mounted on several circles before placing it on a black card stock base and adding the coordinating butterfly and stamped sentiment. 

For my next experiment, I stamped the floral image with black archival ink on white card stock.


I shaded and blended with a water brush inside the flowers using the black watercolor pencil. I added a bit more shading with the brown watercolor pencil.  Blending each time with the water brush.  I came back and added a  heavier shading of black around the inside of the image.  

For the leaves I used the green watercolor pencils and colored around the inside and blended with the water brush.  

Next I decided to bring in pink around the outside of the flowers and a golden brown around the leaves.  I colored on the outside of the lines and then used a water brush to soften the edges and blend the color out. 

I finished the image with a black card stock base and a stamped sentiment. 

I really wanted to use the white watercolor pencil and I tried a few different ideas and this was the one that worked most successfully.  I started with stamping the image using Versamark and clear embossing powder to create an outline of the image on black card stock.

After that I took the white watercolor pencil and shaded and blended the white inside the flower.  This made the white disappear into the black card stock.  I came back and colored again with more pressure and further out to add more shading.  I didn't use the water brush as I wanted the white to pop off the black background in my second round of coloring.
To make the flowers really pop from the background I came back with a white gel pen and outlined the image to make is move and stand out.

Then the sentiment was stamped with Versamark watermark and heat embossed with white embossing powder.  I mounted the image on white and then a black card base. 

Not your typical spring flowers but I had fun exploring the use of white, black and browns with the flowers. 

Suzz

Products: 

Wednesday, April 10, 2024

Lisa's Flower Cards

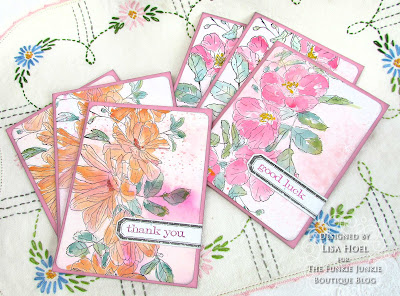
Happy Spring! Our current Funkie Junkie Focus theme is "The Flowers Are Coming" and they are popping out all over, both in the garden and the craft room. I always think it's nice to have some cards on hand for any occasions that come up so I made a set of spring themed flower cards.

Lisa Hoel for The Funkie Junkie Boutique  #creativejuicefreshsqueezed   #tim_holtz #thefunkiejunkieboutique

Think pink!

The beautiful Floral Trims stamp set from Tim Holtz is perfect for creating a focal image on a card! The Simple Sayings stamp set is also a favorite sentiment set that I use often for my cards.


Lisa Hoel for The Funkie Junkie Boutique  #creativejuicefreshsqueezed   #tim_holtz #thefunkiejunkieboutique

I started off by creating several pages of pink inky backgrounds using Distress Spray Stains and Ranger Distress Watercolor Cardstock. I cut them down into card fronts and stamped with Black Soot Archival ink. I then loosely watercolored over the top to fill in the flowers. Easy!

Supplies used:
Tim Holtz Stamp Set - Floral Trims
Tim Holtz Stamp Set - Simple Sayings
Ranger Distress Watercolor Cardstock
Ranger Distress Spray Stains - Kitsch FlamingoSaltwater TaffyPicked Raspberries
Ranger Distress Oxide Spray Stains - Tattered Rose
Ranger Archival Inks - Black Soot, Picked Raspberries
watercolor paint

Thanks for stopping by. Keep an eye on the Funkie Junkie Boutique Blog, Inspiration Ave. because you are now getting regular doses of expanded (and inspiring) content each week. Don't miss it…


Tuesday, April 9, 2024

Teri's Interactive Master Board Card

 Teri Wilson - TerisMailbox

Hello creative friends. It is Teri with Teri's Mailbox posting for the Funkie Junkie Boutique. Out theme is Flowers Are Coming. Today I have another fun interactive card that started with a Master Board to share with you.


I had too much fun creating the Master Board Base and the colorful flowers and leaves for the layered wreath.

I have  youTube video HERE if you prefer to watch.

The MasterBoard


I used a Distress Brayer to add little blocks of Distress Oxide Inks to a piece of Cougar Cardstock. Inks used include Salvaged Patina, Peacock Feathers and Mowed Lawn. By alternating (cleaning the Brayer off in between colors, you can achieve a layered colorful background with ease. Note: this panel is from my stash. I tend to make multiples with different color schemes at one time and save for future use).


I trimmed the Brayered Background to 8.5 x 5.5 inches and started add many stamped images randomly across the piece. Stamps used include: CMS 241 Ledger Script - one of my favorite and often used background stamps, CMS 377 Tine Toadstools, CMS 181 Nature Walk, and CMS 396 Field Notes.


The Card Base


Use an 8.5 x 5.5 inch White Card Base. The heavier the better for me. I often use 110 lb. White Cougar Card Stock for my bases. Score at 2 1/8 inches and 4.25 inches. Use a Bone Folder to crease the card in half and then fold the front panel back to show only half of the A2 base on front.

Trim the stamped panel into one 4.0 x 5.25 panel for the base and two 5.25 x 2.0 panels for the front and inside front. Attach the stamped panels to the card base.

Create the Wreaths

The new Vault Funky Floral Wreath Die Set from Sizzix contains both a wreath die in addition to multiple flowers and leaf dies. If you are a follower, you know I have a background box with lots of distressed ink smooshed panels ready to go. For the flowers, I selected a variety of bright colors to use for the flowers and leaves.

This photo shows the front fold.


Create two sets of die cut wreaths. The front wreath has three layers, two ink smooshed and the additional layer in grey cardstock. The green wreaths were cut from a Mowed Lawn Distress Ink panel from my unfortunately very large stash. The inside wreath consists of two green die cuts. Glue the wreath die cuts together. Arrange the bright flowers on the right side of both wreaths.


Glue the wreath on the base panel. Center the three layer wreath over the top and glue the left side only to the top 1/4 panel.


Select a stamp from the Note Quote set. Using a stamping platform, center the quote on the bottom panel and stamp. Close the card front and restamp on the top quarter panel so the entire sentiment is visible from the front!

Be sure to check out all the great products at The Funkie Junkie Boutique! They carry a great selection!

All of my channel and affiliate links are listed in the Profile on Instagram. I would love to count you as a subbie friend. I appreciate your support. By using my links, I earn a small commission at no cost to you.

Thanks so much for stopping by today! I'd love to have you follow/subscribe on my social media sites InstagramFacebookBlogger and YouTube all named TerisMailbox. Be well. Be creative!


Products Used: 
CMS 241 Ledger Script - one of my favorite and often used background stamps
CMS 377 Tiny Toadstools
CMS 181 Nature Walk
CMS 396 Field Notes


Friday, April 5, 2024

Janna's April Flowers

This week at the TFJB Inspiration Ave we are creating to the theme of “The Flowers Are Coming.” Here I thought I would try a new style of card. Below I have created a blooming pop up card with gorgeous flowers form the Sizzix TH Artsy Stem set.

If you would like to see in-depth details click here for video.


To start off this card, I cut some grey blue Sizzix textured cardstock at 8.5in x 5.5in as a card base.


Then I cut a sheet for the interior of the card at 5in x 4.5in from some white cardstock.


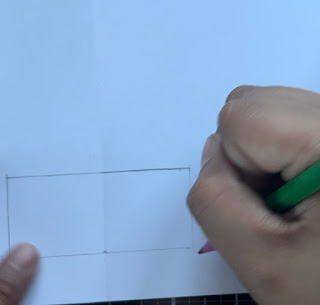
Each paper was folded in half. On the smaller page I drew a 3in line about 2/3 down the centre line. I then drew a second line an inch and a half lower. This will become the cut line for the pop up element.

I then cut alone the top and bottom lines of the rectangle that I drew on the card lining.


Then I cut three small cuts at the top of each folded line. These will become elements for a 3D box that will later hold flowers.


Below are the cut line results and the pop up box. After all the cutting was done I then used ATG tape to stick the card lining with pop up element into the card base.


On the front of the card I added a 5.5in x 4.25 metalic kraft stock panel.


Next we will start working on the main background of the card. Here I decided to do some ink blending with a stencil and the inks Mermaid Lagoon, Squeezed Lemonade, and Picked Raspberry.


The Stampers Anonymous TH stencil I am using is mosaic THS084. I blended the inks in with the TH Tiny Blending Tools.


Below are the blended results.


I then added some spritzes of water to create a distressed look and further blend together the inks.


Next I added some jute string and a floral embellishment to the front of the card. I wrapped the string around the watercolor cardstock base and then taped the ends in the back. The flower was made out of ultra thick embossing powder and distress glazes.


For a sentiment I stamped out hello spring from the bunny hop clear TH stamp set. The sentiment was stamped with distress archival Black Soot.


Now onto some floral fun. I diecut a dozen floral elements from Artsy Stems and distress white cardstock.


I then colored the florals with Distress Mica Crayons and smudged out the colors.


Below are the finished floral results with the Distress Mica Crayons. For colors I used: Yuletide, Cocktail Party, Harvest Moon, Unraveled, Jack-o-Lantern, Merry Mint, Tree Lot, Snow Flurries, and Fortune Teller.


Once all the flowers were colored I trimmed the stems and carefuly set the flowers into the dimensional box. I used tape on the inside of the box to secure the flowers inside.


Below is the finished card and it’s interior.


Thank you so much for joining me here today for TFJB Inspiration Ave. Until next time, happy crafting!

Wednesday, April 3, 2024

Lyla's April Flowers


Hello, Spring! Lyla here, to start you out once again with a new theme from The Funkie Junkie Boutique's owner, Linda Coughlin; "The Flowers Are Coming!". And I'm excited enough for everyone because there are so many new items hitting the shelves from all your favorite top Makers; Tim Holtz, Dina Wakley, and Eileen Hull, as well as Sizzix, Ranger, and Stampers Anonymous... all have new releases, so be sure to check them out. I'm going to start you off with a mix of my 2 faves and sprinkle in some Prima Marketing Flowers that added the perfect touch for this theme. Take a stroll down the greening path and I'll show you what I came up with!


Here's a peek at a few of the newest goodies I found in my mailbox from The Funkie Junkie Boutique!  
I'm using several of these in this make, so let's get that Helpful List of Links out of the way, first.


                                              Ranger Inkssentials Glossy Accents


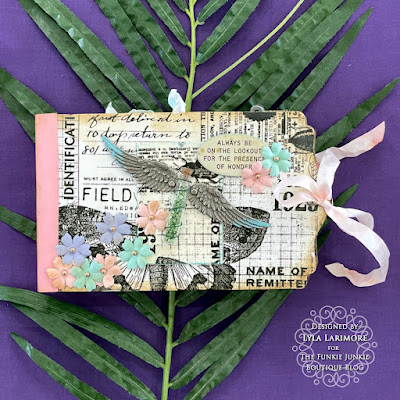
I used the new Eileen Hull Field Notes and Specimen Card Die to cut 5 each of the pages, frames, and nameplates from white Matboard. I cut the edges as pictured above in order to form the spine of the book and pages that fit together inside.


I wanted to be able to have a bulletin board type of page, so I found some stiff Peloton (like a very stiff felt) that easily cut with the same die.


I covered most of the book's matboard with TH Collage Paper (in older Entomology) using Modge Podge.


I was still in our Florida home during the making of this book and found a stash of thin cardstock papers in my drawer that matched the very color scheme I was using.


I did use a glue gun for the Peloton- just around the edges, so I could stick pins wherever I wanted. 


I used a black upholstery thread to help line the book's pages along the spine, as well as Glossy Accents to help it stay securely.


And distressing was added with TH Vintage Photo Oxide Ink on most pieces to give it a bit of age.


I always bring Idea-ology and often carry way too much with me. I thought the little green gem-rocks leftover from Christmas decor gave a nice charm to the front.


Long Fasteners aren't just for looks... they secure everything they're used with.


The Saltwater Taffy Oxide made a nice color to match the one ribbon that came from TFJB as a Freebie since I used both for this book- one as a closure.


PRIMA MARKETING FLOWERS add a beautifully bright splash of color to anything!


I found some older TH Transparent Wings to add to some Paper Dolls Solos and dug out a Salvaged Patina Distress Crayon...


... to go along with my new TH Distress Watercolor Pencil (Set #4) for some matching color on the Paper Dolls.


And this is what my Spring Specimen Book looks like...


FRONT


Pages 1 & 2


The Transparent Things 2 worked great for the Pocket Cards.


I did both sides of the card.


The Distress Crayons and the Distress Watercolor Pencils are both fun to use and give great coloring to the Idea-ology Paper Dolls!


Pages 3 & 4


Adding the pins to this page was much easier because of the Peloton.


Pages 5 & 6


I used the inside throw-away pieces from the frames to layer some cuts of the Transparent Things 2 and line them up for a page on flowers/leaves.


Yeah, I made a mistake: the specimen card is backwards. But I went along with it just because I have rarely ever done a "bug thing" and it's still cute- to me!


You can see the correct side here.


I added details and age to the ephemera pieces, and I enjoyed fitting them all together.

Thanks so very much for joining me on this spring walk through my Specimen Book! This was a really FUN project- especially due to all the new products! Don't forget to get yours by taking a shopping trip over to The Funkie Junkie Boutique!

And be sure to pop back in every couple of days, since there is plenty more to see in the next two weeks as the rest of the amazingly talented Design Team posts their own take on "The Flowers Are Coming!".

Until next time...

Stay Safe &
HAPPY BLOGGING!!